Been along time since I made one of those cards, and was wondering if I could do one with using Lavinia Stamps. So I made it with Using Brusho's, Ivory Card, Black card, (I love using Black Card.) Versafine Clair and Lavinia Stamps. To Make this card I used:

A4 Black card x2
A4 Ivory Card
A5 Ivory Card
Brusho Green Moss
Brusho SprinkleIT Iridescent Flash
Distress Oxide Peacock Feathers
Versafine Clair Nocturne
Versafine Clair Blue Belle
Uni-Ball Signo White Pen.
Lavinia Stamps Fairy Foragers
Lavinia Stamps Moments like These
Lavinia Stamps Inspire
Lavinia Stamps Embrace your Dreams
Lavinia Stamps Believe in Magic
 Lavinia Stamps Stars
Wow Embossing Glitter Singing in the Rain.
Scoreboard ( I used Hunkydory Adorable Scoreboard.)
Heat Gun
Sakura Gelly Roll Glitter Pen
Uni-ball Signo White Pen.
Creative Expression Mini Smoothies.

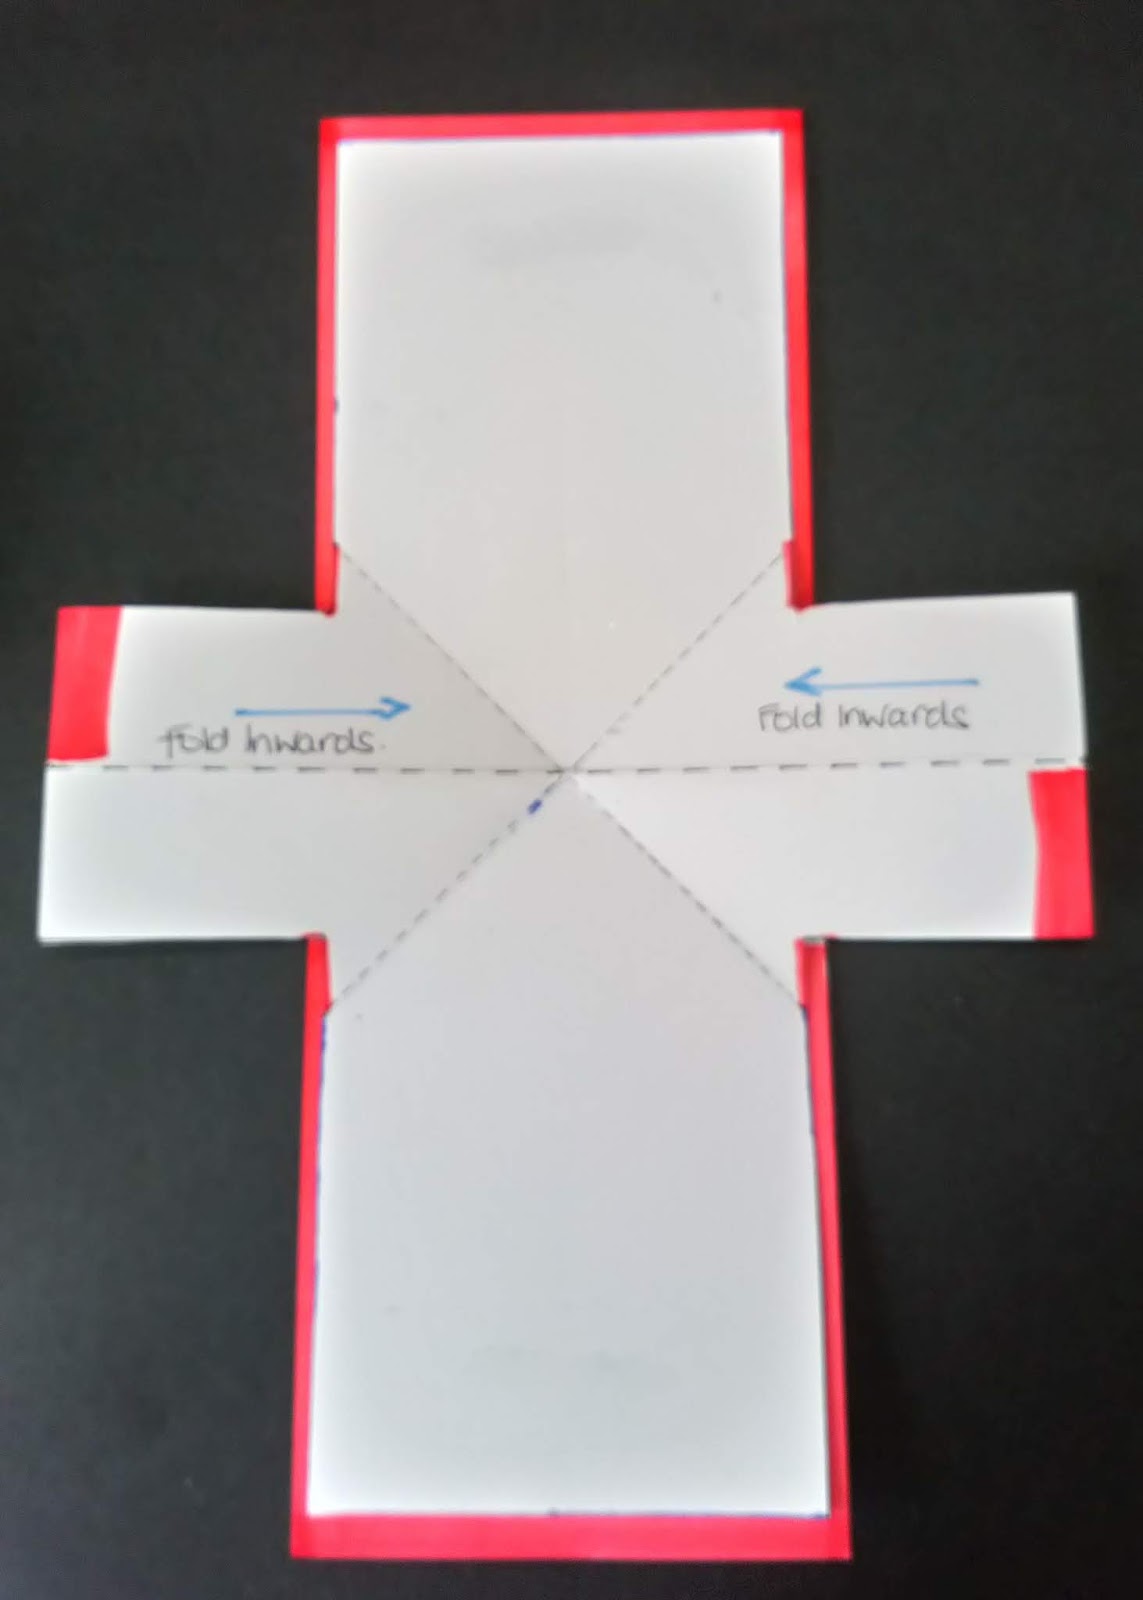
I have done the diagrams in white card as they are easy to see the measurements. (But I used black card.)
With you A4 card you need to trim the long length edge down to 29cm. And score at 14.5cm to fold the card in half. As the diagram shows. On the short edge mark 5.5cm from both corners and the along the long side measure 11cm from the corner, and join them up. So you end up with a cross. From the cross measure up 1.5 cm ( red line on diagram.)

Cut away the corners and diagonally join up the 1.5cm marks with a small ball tool to form a cross and the middle of the cross should be in the middles of your previous score line. Fold and burnish with a bone folder to get a nice crisp edges.


With you second A4 card you need to cut it to 28cm x 8.5cm. Scoring at 7cm, 14cm and 21cm's. You need to make a valley, mountain and valley fold. That's all the hard bit down,phew! Now , the fun bit of decorating it.

With the A4 and A5 Ivory Card. I spritzed it with water and add Brusho's Moss Green to it. Gently spritzed it with water and dabbed the excess off, to create the background. Used a heat gun to dry it.

You need to cut a strip measuring 8cm x 26cm.from the A4 card you just created the background on. Then mark it along the long side at 6.5cm, 13,cm and 19.5 and cut it to give you your four panels for the card. With the rest of the card trace around the House shape to give you two panels.


With the Inspire words that are Dream, Inspire, Art and Love. Stamp them into position with Versafine Clair Blue Belle then quickly sprinkling the clear embossing powder to heat embossed.
Place a circle roughly in the middle and blend with Distress Oxides Peacock Feathers.
Around the edge blend with Versafine Clair Blue Belle.
You can also use a fine black pen to draw a line round the edge freehand to recreate abit more of interest.

Stamp the fairies in Versafine Clair Nocturne and glue them onto the strip you already done with the four panels.
Use the glitter pen gently onto the fairy wings. Mix the Brusho SprinkleIT with some water and paint it onto the top of the circle for a little nit of sparkle.


With the two house shape panels stamp them with Versafine Clair Nocturne. And blend around the edges with Versafine Clair Blue Belle.
To ground the fairy tear a piece of paper and blend Distress Oxide Peacock Feather to ground her.
Glue them on the the cross shape card (house) as shown. You might need to trim those down by turning it over and seeing if those panels you just glued need trimming down.

Fold the card back to the house shape and cut a piece of A4 . Keeping it at the long length but you only need it 10.5cm wide, fold it in half so that the house shape fits inside. Now stick the house shape in place Sticking both sides down. -When you open it up there should be a little border going round as shown by the red.

With you card/Cross shape open, you need to get your strip of card with the four panels and fold it in half and find the middle and make a mark. Place that mark on the fold line as shown. Take the cover off the red double sided tape and stick that strip down


This is how is should look now and closes like this.


 With the A5 Ivory card that you already created you background on you need to cut it to 10cm x 14.5cm. You might need to trim abit of the sides down if its to big to fit on the front of your card. With a large circle place it in the middle but towards the top and blend Distress Oxide Peacock Feathers. Then flick some water on and leave for a few seconds before you dab it with some kitchen roll/tissue to make some water droplets. Dry it with the heat gun. Blend around the edge with Versafine Clair Blue Belle and gently blend the bottom of the circle to create some depth/ shadow.
Stamp a sentiment in the middle of the circle and stick it on the top of the card. You can on the back put some card to write on. Cut a strip of card to go round the card to make a Belly Band Wrap. I stamped the stars on with Versafine Clair Blue Belle and used the Wow Embossing glitter. Which looks a bit like fairy dust as the stars are small.
Thank you for having a look at this.
and dropping by.
Hope to see you again, soon.
Ellie
xx
Another beauty Elle, haven't tried this style before.
ReplyDeleteThank you Ali. It's something different. x
DeleteHow generous of you to do this, can't wait to try it, it's a gorgeous card Ellie xx
ReplyDeleteAwww, thank you Tracey. So nice of you to say so. Doing the tutorial was the hardest part for me. If you have a question I'll be happy to answer it. xx
Delete